Project Overview
This game was the final project for the course Modelation and Simulation of Natural Systems. Throughout the course I've learned many topics such as Physics Simulation, Particle Systems, Autonomous Agents, Cellular Automata and Fractals. The systems I ended up implementing into my game were:
- Physics Simulation
- Autonomous angents and Boids
- Particle System
- Procedural Generation: Cellular Automata
You'll be able to learn how I developed these systems in much more detail in the next section!
Key Systems
Physics Simulation
RigidBody and Collision System
Boids
Autonomous agent that is the brain behind the enemies of this game implementing seek and wander behaviours
Particle System
A simple particle system used for the exhaust of the ship
Cellular Automata
Procedural technique used to make a cave- -like map
Physics Simulation
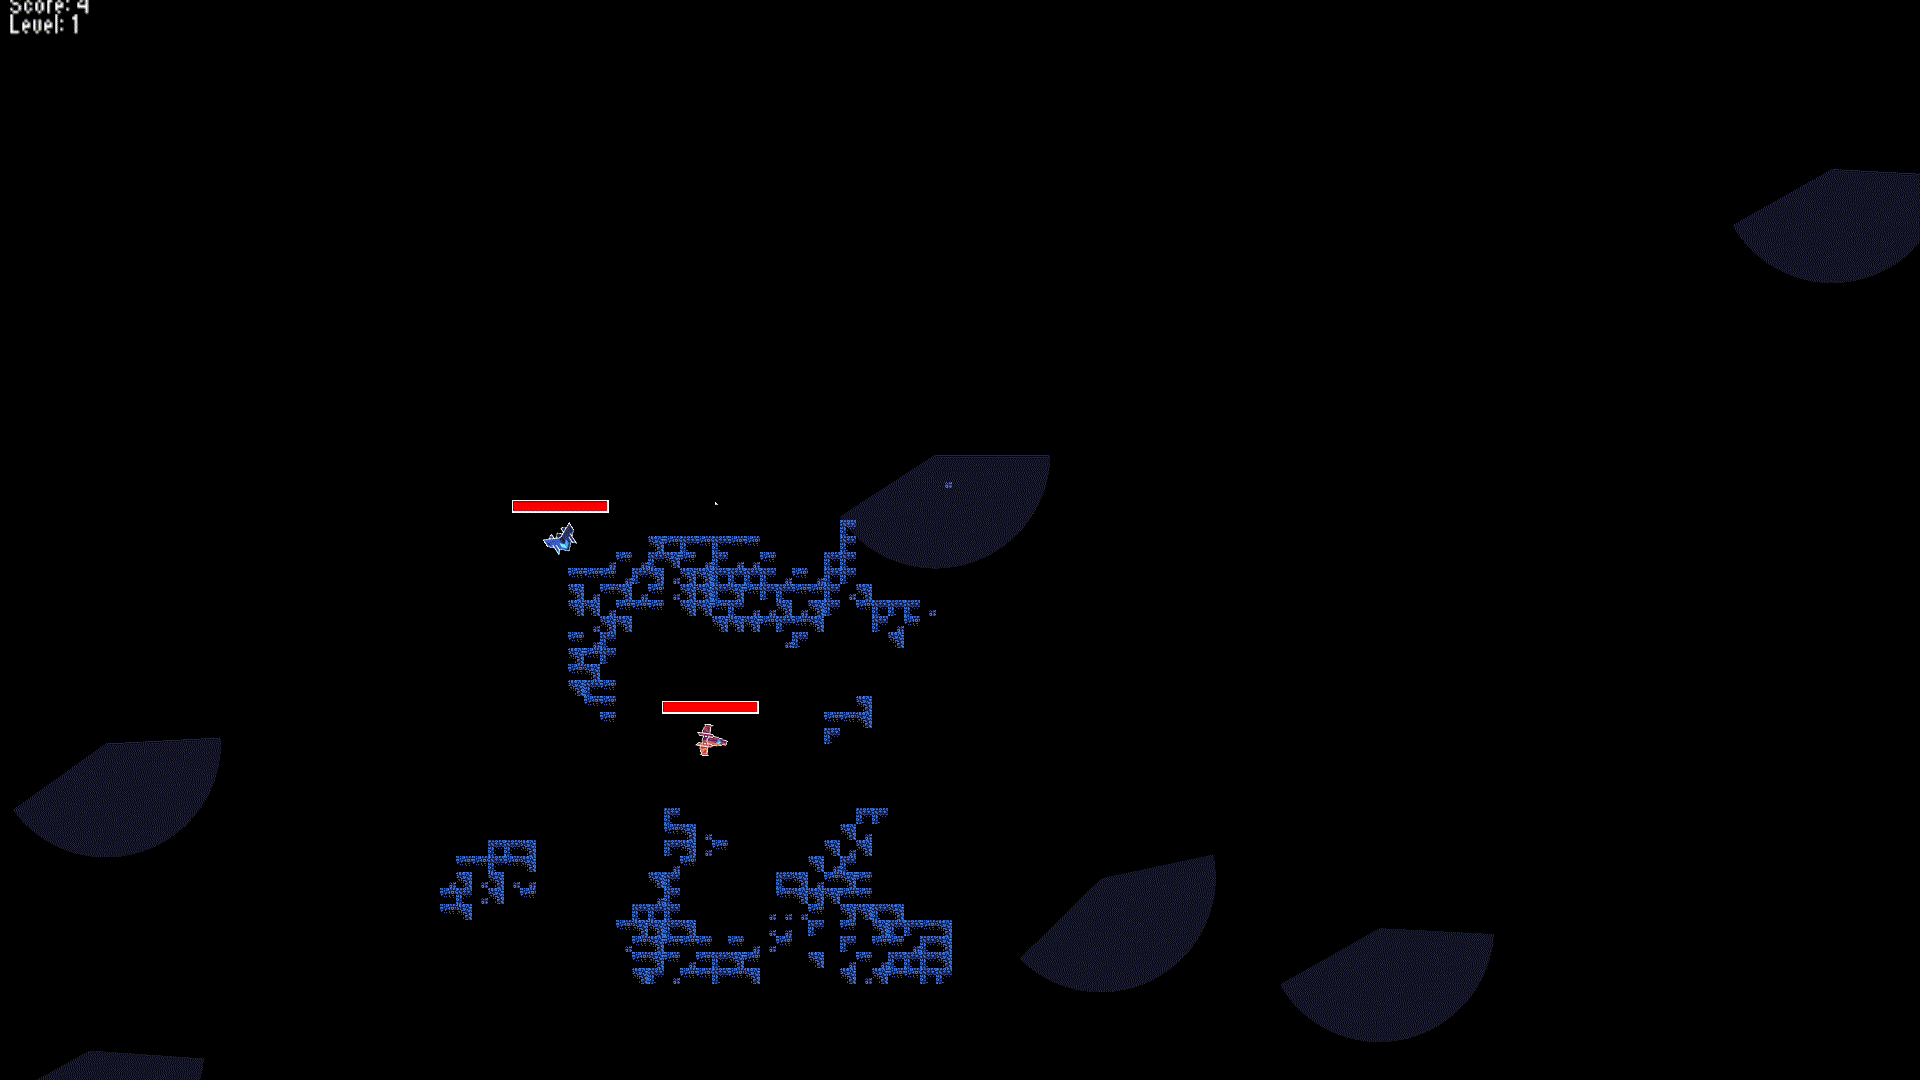
The Body
Before we can have physics in a game we need a way to represent our "things" or our "objects" like the player, enemy, etc, in the simulated physical world of our game. With that in mind I implemented a RigidBody that will represent all the entities that move in my game: the player, the enemy and even projectiles.
A rigid body means that it will not be possible to deform the body, in other words, the distance between any points of a given body stays the same no matter what forces are applied to it. However, the body can move throughout space when forces are applied to it. In this game both friction and velocities are simulated by the rigidBody. For this to be possible we need the following vectors:
- Position Vector with x and y coordinates to represent it's position in space
- 2d Velocity Vector
- 2d Acceleration Vector
- A method to apply force to the body once
- A method to simulate all forces applied to the body
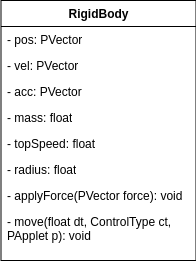
Now that we have a way to represent our body in the virtual world we need a way to be able to, move it move it, through it. In the next diagram you can see how the movement was planned out:
The RigidBody
The RigidBody class has 3 types of movement that each children can use:
- Position - case Position where the Vector Position is directly acessed and altered, equivalent to teleportation
- Velocity - generic case where the body has velocity and acceleration
- Force - where each instance of a RigidBody can override the main way of moving
The following code represents the types of movement mentioned in the class RigidBody:
       public void move(float dt, ControlType ct, PApplet p) {
            switch (ct) {
                    case POSITION:
                        break; //not useful for this game

                    case VELOCITY:
                        vel.add(acc.mult(dt));
                        pos.add(PVector.mult(vel, dt));
                        // acc.mult(0);
                        break;

                    case FORCE:
                        force(dt, p); // each child (extends) of RididBody will have different ways of moving
                        break; // player is different from enemy for example
                    }
                }

        protected abstract void force(float dt, PApplet p);
Movement Implementation
The classes that will extend rigidBody will either use the Velocity type of movement, like particle systems, and classes like the player will override the force method to implement its own way of moving. You can see this in the following code, that is the implementation of the stock and flow diagram:
     protected void force(float dt, PApplet p) {
            PVector frictionForce = PVector.mult(vel, -frictionCoeff);
            displayVectors(p, d, frictionForce, 255, 255, 255);

            vel.add(frictionForce);
            pos.add(PVector.mult(vel, dt));
            vel.add(PVector.mult(acc, dt));

            PVector newForce = PVector.mult(desiredDir(), speed * accelerationBoost);
            displayVectors(p, d, getDesiredDir(), 0, 255, 0);

            // Apply logarithmic acceleration decay based on current speed
            float speedFactor = 1.5f - PApplet.map(vel.mag(), 0, maxSpeed, 0, 1);
            newForce.mult(speedFactor);

            displayVectors(p, d, vel, 0, 0, 255);

            applyForce(newForce);

            vel.limit(maxSpeed);
            protected abstract void force(float dt, PApplet p);
            }
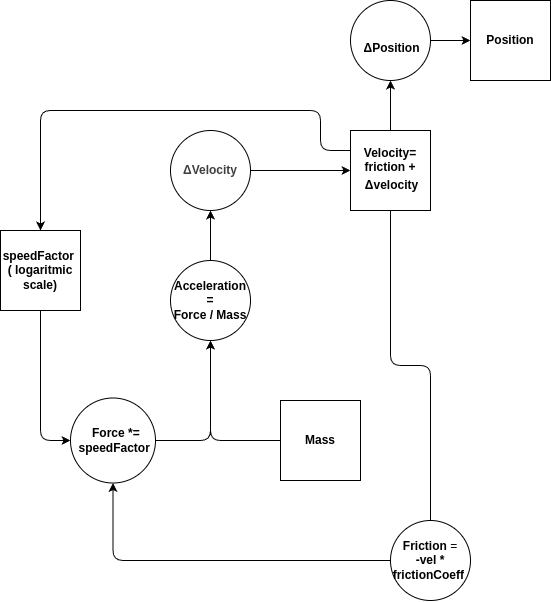
The inspiration for the movement was source based games where when you press a desired key, you'll have your movement incrementally added up until you reach the desired direction, instead of being instantaneous. The current velocity keeps being added a new force until it reaches the new direction vector, which is calculated depending on the input of the player:
The enemy for example is an Autonomous Agent, and it's movement will be similar to the player, however the way the wished direction vector is calculated depends on the behaviour that the agent is using. In this game the boid uses 2 behaviours - wander and seek, which will be explained in greater detail in the Boid section. The following is the force function of the boid class:
            @Override
            public void force(float dt, PApplet p) {
                PVector vd = applyBehaviours(dt, p).copy(); // this line is different

                PVector frictionForce = PVector.mult(vel, -frictionCoeff);

                vel.add(frictionForce);
                pos.add(PVector.mult(vel, dt));
                vel.add(PVector.mult(vd, dt)); //here the paramater vd is different, in player it uses ac

                float speedFactor = 1.5f - PApplet.map(vel.mag(), 0, maxSpeed, 0, 1);
                PVector newForce = PVector.mult(vd, speed * accelerationBoost);
                newForce.mult(speedFactor);

                applyForce(newForce);
                vel.limit(maxSpeed);
            }
In retrospective, the common functionaly in t he force method, between the player and enemy classes, could be refactored into it's own method in the rigidBody class. Only the directional vector is calculated differently and could've been passed as a parameter, to reduce repeated code with the same functionality
Bullet
The Bullet class also implements it's own force method, since once it's been shot I wanted the bullet to move in a straight line, keeping the direction at the moment it was shot. The following code implements this:
            @Override
            protected void force(float dt, PApplet p) {
                pos.x += speed * dirx;
                pos.y += speed * diry;

            }
Particle System
The particle System has the same movement as the player but the particles, use the Velocity movement case of the rigidBody. And with that all entities that use the class RigidBody have it's movement implemented!
Autonomous Agent - Boid
The Boid
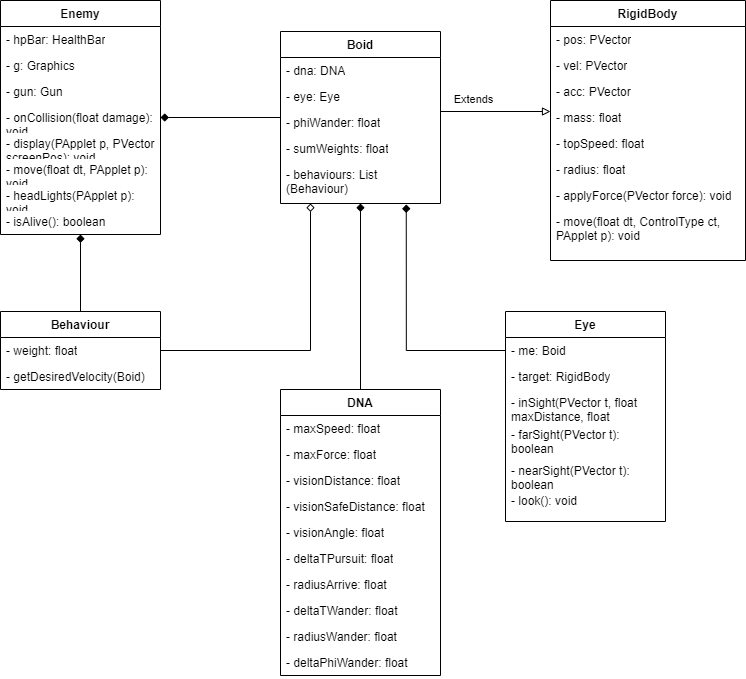
Boids are a form of autonomous agents that can be though of as a small robot that will respond directly to any stimuli its sensors give it without processing it. A boid can have many behaviours and through this course I implemented many but in my game I only ended up using two: Seek and WanderThe boid was used to be the fundamental "inteligence" of the enemy. The enemy will randomly explore the map through the virtual world and if it spots the player it will start seeking it. In the diagram provided it examplifies how the enemy is structured, however in this section only the boid class will be focused on. The different that combined make the enemy are:
- Enemy class - holds the data of the enemy itself
- Behaviour - any boid behaviour extends this class that itself implements IBehaviour
- DNA - defines the possible values for the boid like maxSpeed and maxForce
- Eye - class that enables the boid to "see" the world
- RigidBody - class already explained in the previous section, it represents the body of the boid
Seek Behaviour
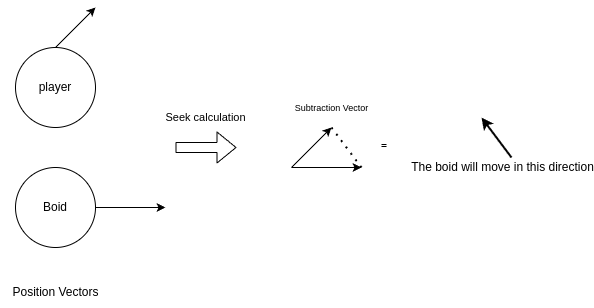
When the player enters the boid vision, the boids position and the player will be substracted, creating the seek vector
@Override
public PVector getDesiredVelocity(Boid me) {
    RigidBody bodyTarget = me.eye.target;
    if (me.getEye().inSight(me.eye.target.getWorldPosition(), me.dna.getVisionDistance(), me.dna.getVisionAngle()))
        return PVector.sub(bodyTarget.getScreenPosition(), me.getScreenPosition());
    else
        return new PVector();
}
Wander Behaviour
The wander behaviour lets the boid wander through the map when a target (the player) is not in it's vision. Given a wanderRadius, the boid "selects" a random point. Give that random point it calculates the distance between itself and that point and then goes to that point. The following diagram examplifies this:
@Override
public PVector getDesiredVelocity(Boid me) {
    PVector center = me.getWorldPosition();
    center.add(me.getVelocity().mult(me.dna.getDeltaTWander()));

    float x = me.dna.getRadiusWander() * (float) Math.cos(me.phiWander);
    float y = me.dna.getRadiusWander() * (float) Math.sin(me.phiWander);
    PVector target = new PVector(x,y);
    target.add(center);
    me.phiWander += 2 *  (Math.random()-0.5 ) * me.dna.getDeltaPhiWander();
    return PVector.sub(target, me.getWorldPosition());
}
Particle System
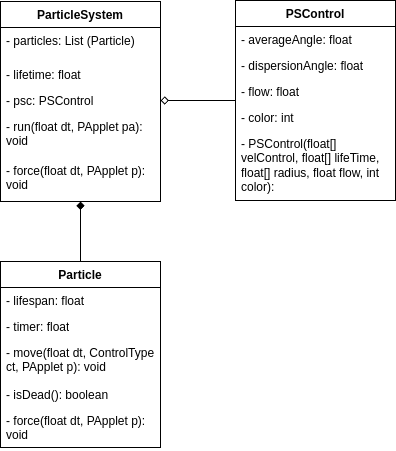
In this game I used a particle system to simulate the exhaust coming from the ship. To achieve this, after implemeting the particle system itself, I added it to the end of the ship and made sure the way the exhaust moves is the same as the player. Therefore the exhaust will always keep its relative position to the ship, the same. It was also fun to learn that William T. Reeves of LucasFilm was the creator of the particle systems, with the iconic "Genesis Effect"
To understand a particle system it's important to understand the key differences between the particles generated by the Particle System and the Particle System itself. A particle system is something that has mass and can move through the virtual space and interact with this virtual world. However the particles itself don't have mass and don't interact with the world outside the system. Therefore the particles live and die by the system. The following diagram is the uml of the particle system that was implemented. To be noted that even tho it's not in the uml, the particle system class extends the class rigidBody
Adding Particles
Depending on the frameRate more or less particles will be added. This means that for computers that are slower and therefore have lower framerates will have less particles added per frame
    private void addParticles(float dt) {
        float particlesPerFrame = psc.getFlow() * dt; // flow -> particulas por segundo
        int n = (int) particlesPerFrame;
        float f = particlesPerFrame - n;

        for (int i = 0; i < n; i++)
            addOneParticle();
        if (Math.random() < f)
            addOneParticle();
    }
    private void addOneParticle() {

        if (particles.size() < maxParticles) {

            Particle particle = new Particle(pos, psc.getRndVel(), psc.getRndRadius(),
                    psc.getRndLifetime(), psc.getColour());
            particles.add(particle);
        } else
            return;
    }
Executing the particle System
After a while the particles will be queued to be deleted. New particles are only added if the particles list has space for it
    public void run(float dt, PApplet pa) { // as par

        super.move(dt, ControlType.FORCE, pa);
        if (isMoving)
            addParticles(dt);
        for (int i = particles.size() - 1; i >= 0; i--) {
            Particle p = particles.get(i);
            p.move(dt, ControlType.VELOCITY, pa);
            if (p.isDead()) {

                particles.remove(i);
            }
        }

    }
Adding Particles
The particle itself is not very complex. Using processing graphical capabilities I decided to draw circles with random colors ranging from dark red to bright orange, to simulate fire produced by an exhaust. To note that it's possible to use sprites to represent the particles
public class Particle extends RigidBody {
    private float lifespan;
    private float timer;
    private int[] colour;

    protected Particle(PVector pos, PVector vel, int radius, float lifespan, int[] colour) {
        super(pos, vel, 0f, radius);
        this.colour = Arrays.copyOf(colour, colour.length);
        this.lifespan = lifespan;
        timer = 0;
    }

    @Override
    public void move(float dt, ControlType ct, PApplet p) {
        super.move(dt, ControlType.VELOCITY, p);
        timer += dt;
    }

    public boolean isDead() {
        return timer > lifespan;
    }

    @Override
    public void display(PApplet p) {

        p.pushStyle();
        float alpha = PApplet.map(timer, 0, lifespan, 255, 0);

        p.fill(getRnd(100, colour[0]), getRnd(10, colour[1]), colour[2], alpha);

        p.noStroke();
        p.circle(pos.x, pos.y, radius * PApplet.PI);
        p.popStyle();

    }

    public static int getRnd(int min, int max) {
        return min + (int) (Math.random() * (max - min));
    }

    @Override
    protected void force(float dt, PApplet p) {
        // TODO Auto-generated method stub
        throw new UnsupportedOperationException("Unimplemented method 'force'");
    }
    }
Cellular Automata
In a future where this game development was finished, this game would be a roguelike. I'm a very big fan of the genre and how it can provide many upon many hours of content through techniques like procedural generation. In the present, the only procedural generation in this game is the map through the use of cellular automata. This blog helped me understand the use of automata to create cave-like maps. The cells that stayed alive after n generations represent the rocks and the dead cells represent empty space that can be navigated through
The level generation system was divided in 3 parts
- The Map that represents the generated map
- The CellularAutomataGenerator: the generator that creates the map through cellular automata
- The cell: The class that models an individual cell

Development Challenges
The first problem was that I had to implement all this systems from scratch in a month, which can be overwhelming. On top of that we were required to use the Processing library with java which is not a tool designed to make games. However despite this hurdles I sucessfuly implemented the before mentioned systems
Personal Reflection
This project was useful to learn how physics can be implement in games. In particular it helped me have a better grasp around the implementation of a rigidBody which is common in many engines. It also helped me understand different systems like boids, cellular automata and particle Systems
- I feel more confortable using CA for map generation
- I have learned to implement all the systems used
- I have learned how particle systems work and all the other systems work
- Overall this project was an incredbile learning opportuniy!